728x90
Kubernetes 실습 :: Virtual Machine에서 Kubernetes 설치 (2) master 서버 설정
Vscode로 서버(192.168.56.100) 접속
<양식>
Host 192.168.56.100
  HostName 192.168.56.100
  User ubuntu
  Port 22
1. SWAP 영구 비활성화
- 비활성화가 영구적으로 적용되지 않아 추후 다시 작업 진행 예정
ubuntu@ubuntu:~$ sudo swapoff -a // 스왑 공간을 비활성화
[sudo] password for ubuntu: ******
ubuntu@ubuntu:~$ free // 메모리 사용량을 표시
total used free shared buff/cache available
Mem: 4001000 953268 1831508 35160 1216224 2779356
Swap: 0 0 0
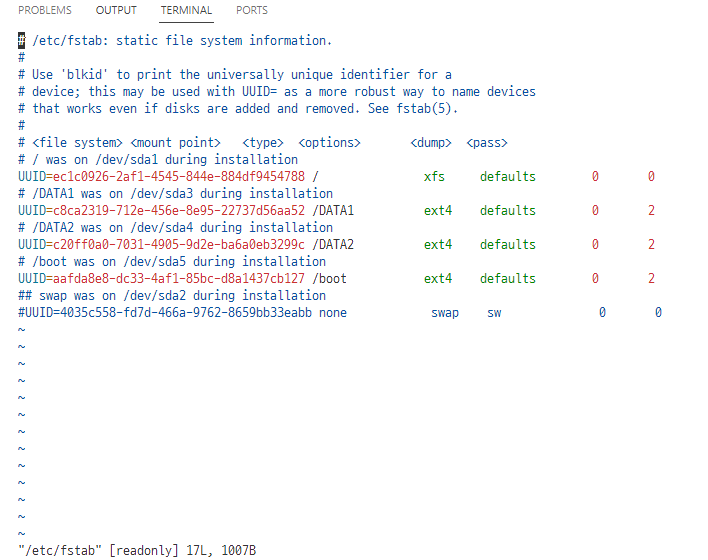
ubuntu@ubuntu:~$ sudo sed -i '/ swap / s/^/#/' /etc/fstab
// /etc/fstab 파일에 있는 스왑 파티션을 마운트하는 줄을 주석 처리하여(앞에 #을 추가하여) 부팅 시에 활성화되지 않도록 영구 적용
<설정 확인>
ubuntu@ubuntu:~$ cat /etc/fstab
# /etc/fstab: static file system information.
#
# Use 'blkid' to print the universally unique identifier for a
# device; this may be used with UUID= as a more robust way to name devices
# that works even if disks are added and removed. See fstab(5).
#
# <file system> <mount point>   <type>  <options>       <dump>  <pass>
# / was on /dev/sda1 during installation
UUID=ec1c0926-2af1-4545-844e-884df9454788 /               xfs     defaults        0       0
# /DATA1 was on /dev/sda3 during installation
UUID=c8ca2319-712e-456e-8e95-22737d56aa52 /DATA1          ext4    defaults        0       2
# /DATA2 was on /dev/sda4 during installation
UUID=c20ff0a0-7031-4905-9d2e-ba6a0eb3299c /DATA2          ext4    defaults        0       2
# /boot was on /dev/sda5 during installation
UUID=aafda8e8-dc33-4af1-85bc-d8a1437cb127 /boot           ext4    defaults        0       2
## swap was on /dev/sda2 during installation
**#UUID=4035c558-fd7d-466a-9762-8659bb33eabb none            swap    sw              0       0**
<서버 기본 서비스 설치>
1. 서비스 설치
ubuntu@ubuntu:~$ sudo apt install net-tools openssh-server vim tree htop
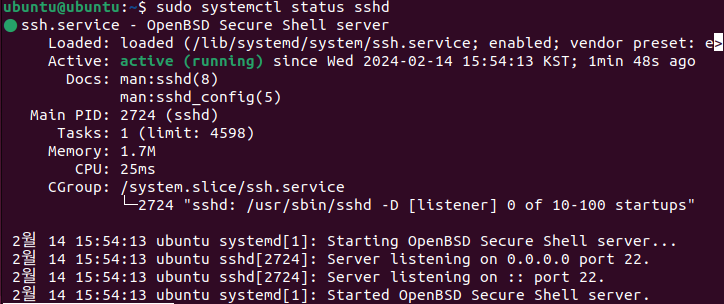
ubuntu@ubuntu:~$ sudo systemctl status sshd
- sshd 서비스 구동 확인 (VsCode로 접속하기 위함)
- ntp 서비스 확인
- NTP 서버와의 현재 연결 상태 출력
- 시스템이 현재 어떤 NTP 서버와 연결되어 있는지 및 해당 서버들과의 동기화 상태 확인
ubuntu@ubuntu:~$ sudo ntpq -p
     remote           refid      st t when poll reach   delay   offset  jitter
==============================================================================
 0.ubuntu.pool.n .POOL.          16 p    -   64    0    0.000   +0.000   0.000
 1.ubuntu.pool.n .POOL.          16 p    -   64    0    0.000   +0.000   0.000
 2.ubuntu.pool.n .POOL.          16 p    -   64    0    0.000   +0.000   0.000
 3.ubuntu.pool.n .POOL.          16 p    -   64    0    0.000   +0.000   0.000
 ntp.ubuntu.com  .POOL.          16 p    -   64    0    0.000   +0.000   0.000
+106.247.248.106 17.253.68.253    2 u   11   64    1   14.990   -2.043   4.492
-39.118.108.234  180.69.46.108    3 u   16   64    1   18.056   -1.792  17.004
-ec2-13-209-84-5 17.253.114.253   2 u   32   64    1   14.763   +0.327   9.163
*193.123.243.2   125.185.190.74   2 u   29   64    1   79.698   -6.876   6.302
+ap-northeast-2. 103.1.106.69     2 u   36   64    1   79.157  +14.728  33.330
 185.125.190.56  194.121.207.249  2 u   44   64    1  280.114   -6.220   0.000
2. 시간 동기화 서비스 설치
ubuntu@ubuntu:~$ sudo apt install ntp
ubuntu@ubuntu:~$ sudo systemctl restart ntp
- ntp 서비스 확인
- NTP 서버와의 현재 연결 상태 출력
- 시스템이 현재 어떤 NTP 서버와 연결되어 있는지 및 해당 서버들과의 동기화 상태 확인
ubuntu@ubuntu:~$ sudo ntpq -p
     remote           refid      st t when poll reach   delay   offset  jitter
==============================================================================
 0.ubuntu.pool.n .POOL.          16 p    -   64    0    0.000   +0.000   0.000
 1.ubuntu.pool.n .POOL.          16 p    -   64    0    0.000   +0.000   0.000
 2.ubuntu.pool.n .POOL.          16 p    -   64    0    0.000   +0.000   0.000
 3.ubuntu.pool.n .POOL.          16 p    -   64    0    0.000   +0.000   0.000
 ntp.ubuntu.com  .POOL.          16 p    -   64    0    0.000   +0.000   0.000
+106.247.248.106 17.253.68.253    2 u   11   64    1   14.990   -2.043   4.492
-39.118.108.234  180.69.46.108    3 u   16   64    1   18.056   -1.792  17.004
-ec2-13-209-84-5 17.253.114.253   2 u   32   64    1   14.763   +0.327   9.163
*193.123.243.2   125.185.190.74   2 u   29   64    1   79.698   -6.876   6.302
+ap-northeast-2. 103.1.106.69     2 u   36   64    1   79.157  +14.728  33.330
 185.125.190.56  194.121.207.249  2 u   44   64    1  280.114   -6.220   0.000
3. IP 포워딩 활성화
- IP 포워딩: 패킷이 한 네트워크 인터페이스를 통해 도착한 후 다른 인터페이스로 전달되도록 하는 기능
root@ubuntu:~# echo '1' > /proc/sys/net/ipv4/ip_forward
// IP 포워딩을 활성화
root@ubuntu:~# cat /proc/sys/net/ipv4/ip_forward
1
// 포워딩 활성화 확인
4. contianerd를 이용한 continer runtime 구성
- 두 개의 커널 모듈을 로드하고 설정 파일 제작
root@ubuntu:~# cat <<EOF | sudo tee /etc/modules-load.d/containerd.conf
overlay
br_netfilter
EOF
>> 'overlay'와 'br_netfilter'라는 두 개의 모듈을 /etc/modules-load.d/containerd.conf 파일에 쓰는 것입니다. 이렇게 하면 시스템이 부팅될 때 이 두 모듈이 자동으로 로드

overlay
br_netfilter
root@ubuntu:~# cat /etc/modules-load.d/containerd.conf
<적용 확인>
overlay
br_netfilter

** 'overlay'와 'br_netfilter' 모듈을 수동으로 로드해 실행
root@ubuntu:~# sudo modprobe overlay
root@ubuntu:~# sudo modprobe br_netfilter
5. iptables 설정
- Kubernetes와 같은 컨테이너 오케스트레이션 플랫폼을 설정
root@ubuntu:~# sudo cat <<EOF | sudo tee /etc/sysctl.d/99-kubernetes-cri.conf
net.bridge.bridge-nf-call-iptables = 1
net.ipv4.ip_forward = 1
net.bridge.bridge-nf-call- = 1
ip6tables
EOF
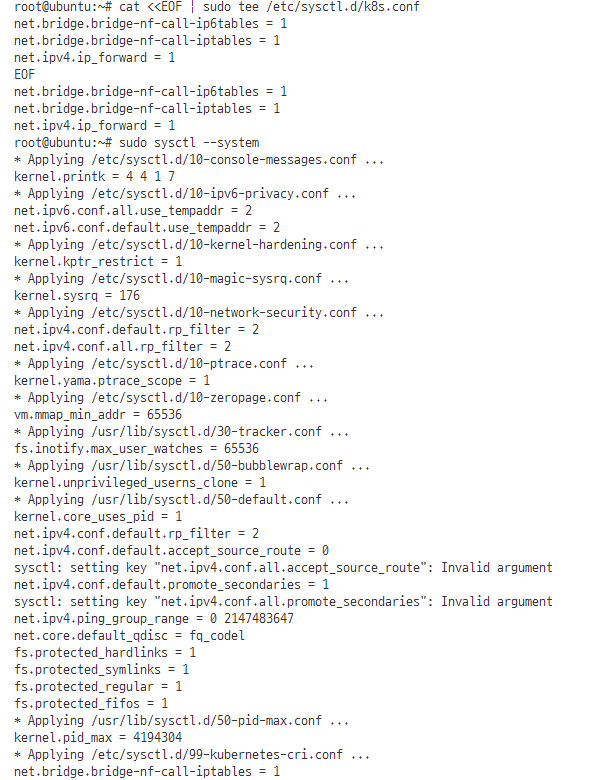
root@ubuntu:~# cat <<EOF | sudo tee /etc/modules-load.d/k8s.conf
br_netfilter
EOF
root@ubuntu:~# cat <<EOF | sudo tee /etc/sysctl.d/k8s.conf
net.bridge.bridge-nf-call-ip6tables = 1
net.bridge.bridge-nf-call-iptables = 1
net.ipv4.ip_forward = 1
EOF
6. apt가 https를 사용할 수 있도록 지원하는 프로그램 설치
root@ubuntu:~# sudo sysctl --system
7. 도커 공식 GPG 키 설정
ubuntu@ubuntu:~$ sudo install -m 0755 -d /etc/apt/keyrings
ubuntu@ubuntu:~$ curl -fsSL <https://download.docker.com/linux/ubuntu/gpg> | sudo gpg --dearmor -o /etc/apt/keyrings/docker.gpg
ubuntu@ubuntu:~$ sudo chmod a+r /etc/apt/keyrings/docker.gpg
ubuntu@ubuntu:~$ echo \\
  "deb [arch=$(dpkg --print-architecture) signed-by=/etc/apt/keyrings/docker.gpg] <https://download.docker.com/linux/ubuntu> \\
  $(. /etc/os-release && echo "$VERSION_CODENAME") stable" | \\
  sudo tee /etc/apt/sources.list.d/docker.list > /dev/null

ubuntu@ubuntu:~$ cat /etc/apt/sources.list

ubuntu@ubuntu:~$ sudo apt-get update
Hit:1 <http://kr.archive.ubuntu.com/ubuntu> jammy InRelease
Hit:2 <http://kr.archive.ubuntu.com/ubuntu> jammy-updates InRelease
Hit:3 <http://kr.archive.ubuntu.com/ubuntu> jammy-backports InRelease
Get:4 <https://download.docker.com/linux/ubuntu> jammy InRelease [48.8 kB]
Get:5 <https://download.docker.com/linux/ubuntu> jammy/stable amd64 Packages [26.7 kB]
Hit:6 <http://security.ubuntu.com/ubuntu> jammy-security InRelease
Fetched 75.5 kB in 11s (6,799 B/s)
Reading package lists... Done
8. docker cgroup => systemd설정
ubuntu@ubuntu:~$sudo vi /etc/docker/daemon.json
<vi 편집내용>
sudo vi /etc/docker/daemon.json
{
  "exec-opts": ["native.cgroupdriver=systemd"], "log-driver": "json-file",
  "log-opts": {
    "max-size": "100m"
  },
  "storage-driver": "overlay2"
}
9. docker containerd 설치
ubuntu@ubuntu:~$ sudo apt-cache policy docker-ce
ubuntu@ubuntu:~$ sudo apt install docker-ce docker-ce-cli containerd.io docker-buildx-plugin docker-compose-plugin
<docker containerd 설치 확인>
ubuntu@ubuntu:~$ sudo docker version
Client: Docker Engine - Community
 Version:           25.0.3
 API version:       1.44
 Go version:        go1.21.6
 Git commit:        4debf41
 Built:             Tue Feb  6 21:13:09 2024
 OS/Arch:           linux/amd64
 Context:           default

Server: Docker Engine - Community
 Engine:
  Version:          25.0.3
  API version:      1.44 (minimum version 1.24)
  Go version:       go1.21.6
  Git commit:       f417435
  Built:            Tue Feb  6 21:13:09 2024
  OS/Arch:          linux/amd64
  Experimental:     false
 containerd:
  Version:          1.6.28
  GitCommit:        ae07eda36dd25f8a1b98dfbf587313b99c0190bb
 runc:
  Version:          1.1.12
  GitCommit:        v1.1.12-0-g51d5e94
 docker-init:
  Version:          0.19.0
  GitCommit:        de40ad0
ubuntu@ubuntu:~$ sudo sh -c "containerd config default > /etc/containerd/config.toml"
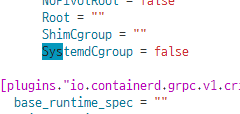
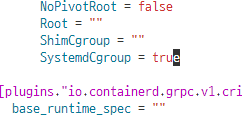
ubuntu@ubuntu:~$ sudo vi /etc/containerd/config.toml
<vi 편집 내용>
A. disabled_plugins = [] 빈칸인지 확인
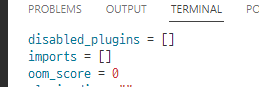
B. SystemdCgroup = true로 변경
ubuntu@ubuntu:~$ sudo systemctl restart containerd.service
9. Docker 설정
ubuntu@ubuntu:~$ sudo mkdir -p /etc/systemd/system/docker.service.d
ubuntu@ubuntu:~$ sudo usermod -aG docker ubuntu
ubuntu@ubuntu:~$ sudo systemctl daemon-reload
ubuntu@ubuntu:~$ sudo systemctl enable docker
Synchronizing state of docker.service with SysV service script with /lib/systemd/systemd-sysv-install.
Executing: /lib/systemd/systemd-sysv-install enable docker
ubuntu@ubuntu:~$ sudo systemctl status docker
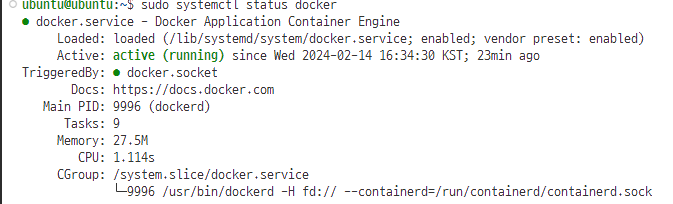
ubuntu@ubuntu:~$ sudo systemctl restart docker
ubuntu@ubuntu:~$ sudo systemctl restart containerd.service
reboot 재가동 후 설치 및 버전 확인
ubuntu@ubuntu:~$ docker version
Client: Docker Engine - Community
 Version:           25.0.3
 API version:       1.44
 Go version:        go1.21.6
 Git commit:        4debf41
 Built:             Tue Feb  6 21:13:09 2024
 OS/Arch:           linux/amd64
 Context:           default

Server: Docker Engine - Community
 Engine:
  Version:          25.0.3
  API version:      1.44 (minimum version 1.24)
  Go version:       go1.21.6
  Git commit:       f417435
  Built:            Tue Feb  6 21:13:09 2024
  OS/Arch:          linux/amd64
  Experimental:     false
 containerd:
  Version:          1.6.28
  GitCommit:        ae07eda36dd25f8a1b98dfbf587313b99c0190bb
 runc:
  Version:          1.1.12
  GitCommit:        v1.1.12-0-g51d5e94
 docker-init:
  Version:          0.19.0
  GitCommit:        de40ad0
ubuntu@ubuntu:~$ docker info
Client: Docker Engine - Community
 Version:    25.0.3
 Context:    default
 Debug Mode: false
 Plugins:
  buildx: Docker Buildx (Docker Inc.)
    Version:  v0.12.1
    Path:     /usr/libexec/docker/cli-plugins/docker-buildx
  compose: Docker Compose (Docker Inc.)
    Version:  v2.24.5
    Path:     /usr/libexec/docker/cli-plugins/docker-compose

Server:
 Containers: 0
  Running: 0
  Paused: 0
  Stopped: 0
 Images: 0
 Server Version: 25.0.3
 Storage Driver: overlay2
  Backing Filesystem: xfs
  Supports d_type: true
  Using metacopy: false
  Native Overlay Diff: true
  userxattr: false
 Logging Driver: json-file
 Cgroup Driver: systemd
 Cgroup Version: 2
 Plugins:
  Volume: local
  Network: bridge host ipvlan macvlan null overlay
  Log: awslogs fluentd gcplogs gelf journald json-file local splunk syslog
 Swarm: inactive
 Runtimes: io.containerd.runc.v2 runc
 Default Runtime: runc
 Init Binary: docker-init
 containerd version: ae07eda36dd25f8a1b98dfbf587313b99c0190bb
 runc version: v1.1.12-0-g51d5e94
 init version: de40ad0
 Security Options:
  apparmor
  seccomp
   Profile: builtin
  cgroupns
 Kernel Version: 6.5.0-17-generic
 Operating System: Ubuntu 22.04.3 LTS
 OSType: linux
 Architecture: x86_64
 CPUs: 2
 Total Memory: 3.816GiB
 Name: ubuntu
 ID: 6b3d83b0-2f50-4bf7-9f26-bbd4bab3c740
 Docker Root Dir: /var/lib/docker
 Debug Mode: false
 Experimental: false
 Insecure Registries:
  127.0.0.0/8
 Live Restore Enabled: false
10. Kubernetes 1.28 설치
ubuntu@ubuntu:~$ sudo curl -fsSL <https://pkgs.k8s.io/core:/stable:/v1.28/deb/Release.key> | sudo gpg --dearmor -o /etc/apt/keyrings/kubernetes-apt-keyring.gpg
ubuntu@ubuntu:~$ sudo echo 'deb [signed-by=/etc/apt/keyrings/kubernetes-apt-keyring.gpg] <https://pkgs.k8s.io/core:/stable:/v1.28/deb/> /' | sudo tee /etc/apt/sources.list.d/kubernetes.list
ubuntu@ubuntu:~$ sudo apt update
ubuntu@ubuntu:~$ sudo apt-cache policy kubeadm
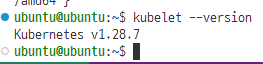
<설치 확인>
ubuntu@ubuntu:~$ kubeadm version
kubeadm version: &version.Info{Major:"1", Minor:"28", GitVersion:"**v1.28.7**", GitCommit:"c8dcb00be9961ec36d141d2e4103f85f92bcf291", GitTreeState:"clean", BuildDate:"2024-02-14T10:39:01Z", GoVersion:"go1.21.7", Compiler:"gc", Platform:"linux/amd64"}
11. 자동 업데이트 방지
ubuntu@ubuntu:~$ sudo apt-mark hold kubelet kubeadm kubectl
kubelet set on hold.
kubeadm set on hold.
kubectl set on hold.
12. kubelet 서비스 등록
ubuntu@ubuntu:~$ sudo systemctl daemon-reload
ubuntu@ubuntu:~$ sudo systemctl restart kubelet.service
ubuntu@ubuntu:~$ sudo systemctl enable --now kubelet.service